Wednesday, 27 January 2016

Matte Almond Nails


I have always loved super glossy nails however, things have changed as I have decided to go matte and I love it! I know, what a big change in life! I feel that matte nude nails look super classy and elegant. I have also been rocking almond shape nails which I feel looks great when they're matte.

Shaping my nails is the most exciting part! I have been able to keep them long and strong thanks to my trusty nail strengthening polish, 'Hard as Nails' by Sally Hansen which I have regularly mentioned in my posts. It has helped me immensely and literally lives on my nails. Thank you Sally!

Here are a few photos of each stage showing you what I do to achieve my matte nude almond nails. 


1. Bare nails

2. One coat of Hard as Nails

3. One or two coats of colour. Here I have one coat on which I find is usually enough for a nude shade.

4. Another coat of Hard as Nails to lock everything in (I do this because it hardens my nails), you can skip this stage if you applied two coats of colour.


5. Finish with one coat of Barry M's Matte top coat.

I am trying to grow my nails out longer so they'll be the full almond shape but I'll see how that goes! I'm also quite excited to see how my other nail polishes look with a matte top coat!


Related posts:

Saturday, 23 January 2016

2015 Makeup Favourites


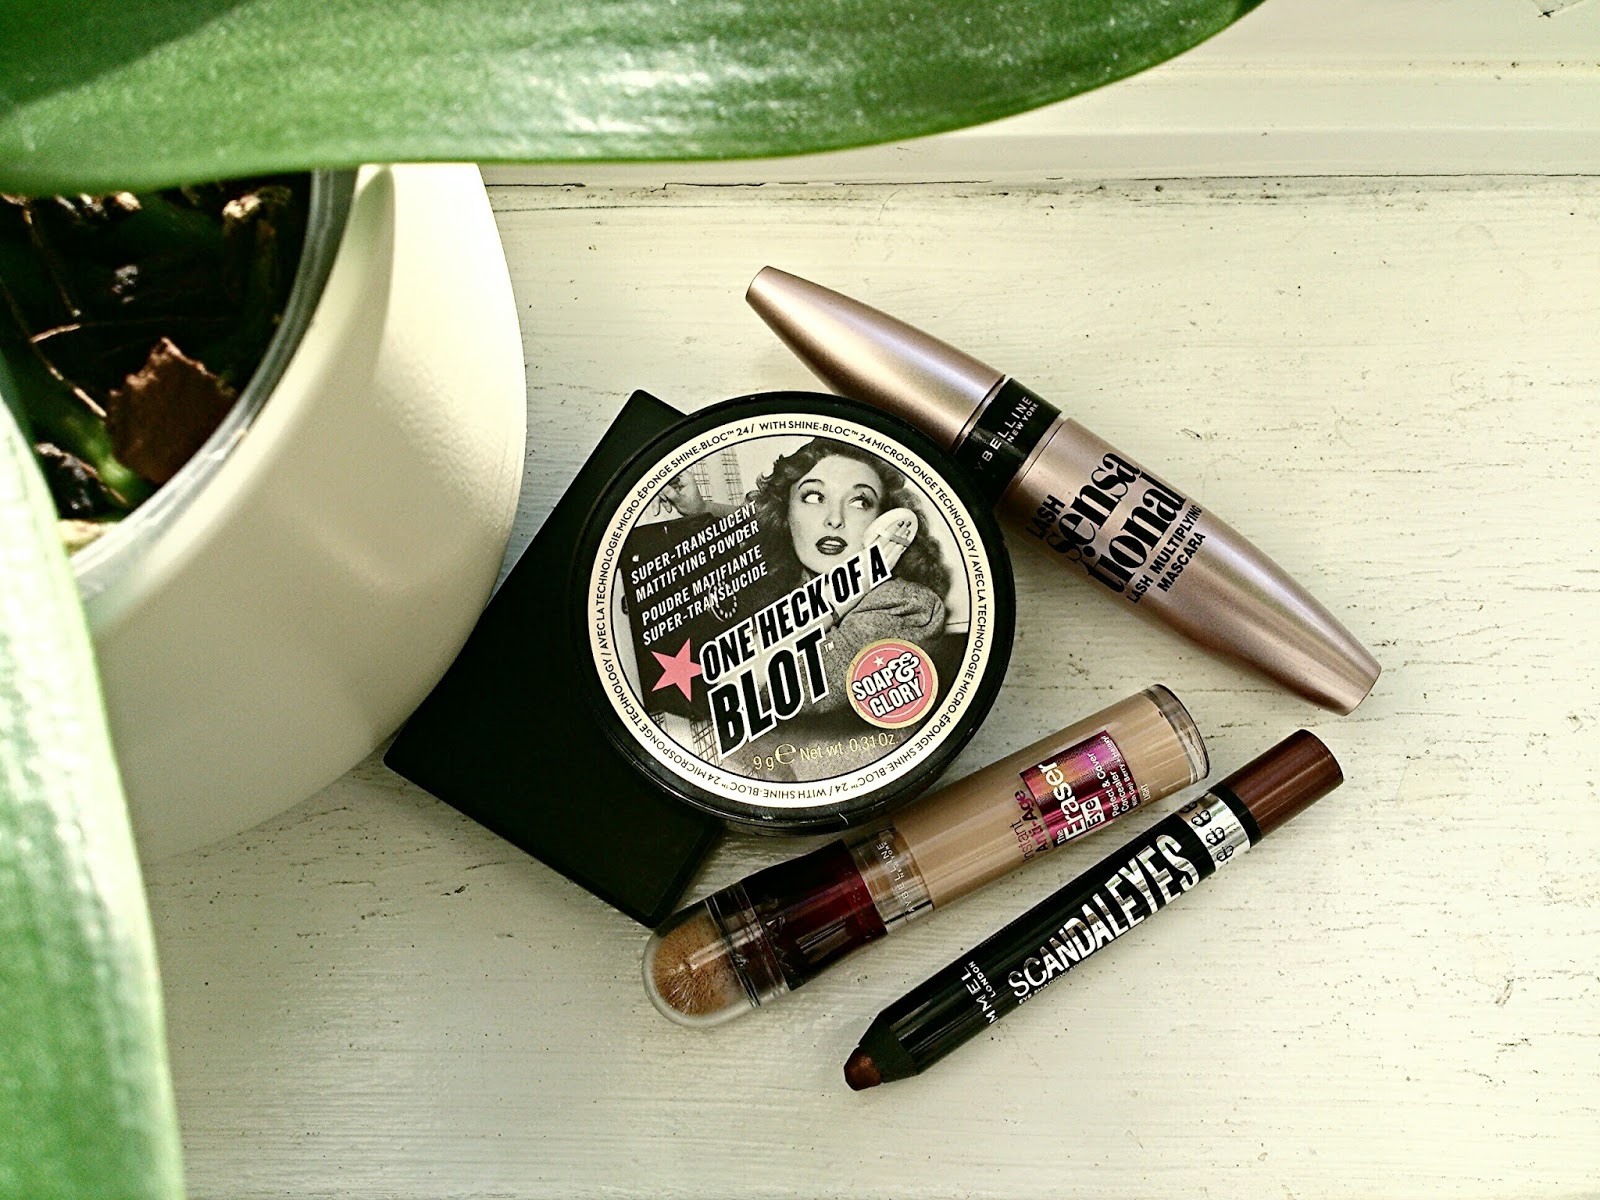
So this is my first post of 2016 and we're already speeding through the month of January, how scary is that. I've got a few makeup bits that I used throughout 2015 and will definitely be taking them with me into 2016. I'm not a huge makeup person and tend to stick to the same products if they work for me. These products are all drugstore and have been a part of my everyday makeup.  


Maybelline Age Rewind Concealer
(Light)

This has been my all time favourite concealer. The consistency is nice and creamy and easy to blend. It provides enough coverage to hide my dark circles and it really brightens up the under eye area. I also apply it on any blemishes and spots I may have, and then tap and blend it in with my fingers or brush and I'm good to go. I don't really like wearing heavy makeup on my skin for an everyday look so using this concealer alone is usually enough. This concealer always sells out fast especially in the shade 'light' so I always try to get a few extra!

Maybelline Sensational Mascara

My all time favourite mascara used to be Maybelline's The Falsies but this mascara has definitely taken its spot.  My lashes are straight lashes that don't like staying curled but this mascara really works for me. It really fans out my lashes and provides great length and volume without feeling heavy. I usually apply two coats and it doesn't go clumpy or flaky when it dries. 

Rimmel Scandaleyes Eyeshadow Stick
(Bad Girl Bronze)

I tend to go for a neutral brown slightly smokey eye look as my everyday look. I have really enjoyed using this eyeshadow stick by Rimmel as it's a quick and easy way of applying eyeshadow. I just dab it onto my eyelids and blend it out either with my fingers or a brush. I also use it as an eyeliner and then smudge it out using my real techniques accent brush which I love. The texture is smooth and the pigmentation is good. It has a shimmery metallic finish which you can build on if you wish to. 

Sleek Contour Kit  
(Light)

As you can probably tell from the picture I have been using this contour powder a lot. What I love about it is that it is matte whereas a lot of contour/bronzing powders have shimmers in them. It blends nicely and it's not too obvious but natural looking. It doesn't look orange on the skin either which is great. It also has a highlighter powder which I have barely used as I don't often highlight.


Soap and Glory Blotting Powder

I actually did a post on this powder a few months ago on why I loved it so much, you can check it out here if you want to. I am still using it and still loving it!

So that's it, those were my top favourite makeup products of 2015! 


Tuesday, 22 December 2015

Printing Photos with Photobox


The task of printing out photos always cropped up in random conversations with people, 'I really need to print out my photos', I'm definitely going to print them this week'. I kept saying it until one day I thought to myself I actually really do need to print them out. The thought of losing my photos scared me. Imagine one day I lost one of my memory cards that stored all my favourite ones or it just wouldn't open! All those memories gone! I also wasn't sure on where to start. Should I pop into a shop to use one of those photo kiosks or should I do it online?

This is where Photobox comes in. One of my close friends used this online photo printing service and recommended it. The great news is that I really liked it and found it really simple to use. After creating an account, you can upload hundreds of photos into different albums. Your photos will then be saved there, which you can choose to delete if you wish to or you can leave it there as back up. 

There are different print sizes but I wanted a bunch of classic photos so I opted for 6x4 with a glossy finish. You can also choose a matte finish or even add a white border. A majority of the photos were taken with my phone and they still came out really good. The colours came out really vivid and the photos were printed on what feels like good quality paper. There weren't any blurry or misprinted ones. 


They were packed in small cute hard plastic cases which provided great protection. Delivery was great too as it was packed well and arrived on time. I didn't experience anything bad during the numerous occasions I ordered from them so I think I would definitely be ordering more in the future!

A word of warning, as most cameras and phones don't take photos to fit for example a classic 6x4 print, depending on what size you choose, you will have to go through each photo to either crop or shrink it to fit. This can be a long process if you've just added 300 photos into your basket, so try to add one album at a time and work through them. The good thing is that you can leave it saved in your basket, log off and carry on later. 


Tips

Here are some tips that I think might be useful for when you start your mini photo printing project:

* Whether you have your photos on a memory stick or on your laptop, try and organise them into folders (such as Birthdays, New Years) before you start to upload them onto Photobox for printing. This speeds up the process and makes it a whole lot easier when you're choosing ones to print because you'll be going through folder by folder. There'll be a less chance of you uploading certain photos twice or missing out your favourites. It takes time but it'll definitely be worth it.

* I made the mistake of not printing any photos for years so it all built up. When you feel like your collection is getting quite big, print them out. I'm definitely not going to wait for another five years or more again!

* If you're going to print out a few, it would probably be better to pop into a shop. However, if you're going to print out literally hundreds like I did, I think it's best to do it online. That way, you can do it all from the comfort of your own home, in your own time and it works out cheaper anyway.

* Photobox always has good discount codes on their website which saved me a lot of money. So keep a look out for their special deals!


Once you have them printed, you'll know there'll always be there, to flick through whenever you want to whether that be with your siblings, when you're bored or when you're feeling nostalgic. You might even want to go back to an old photo to remind yourself of how dodgy your eyebrows looked (that's me). I've currently got my photos stored in a shoe box, now I need to find some nice photo albums to pop them in but that's another mission for another day!


Wednesday, 25 November 2015

Lamora Brushes


Here's a little post on an eye brush set by Lamora which I randomly came across when I was on the Amazon website. I hadn't heard of this brand before so after seeing that it had a generous amount of positive reviews, I thought I'd give it a go.

For the price I paid for these brushes (which was a BARGAIN!), I am pleased to say that they are pretty good. Sometimes you expect bad quality brushes when you spend less on them but this is not the case. I have been using them for a few weeks now and they actually do a really good job.


The bristles are super soft and feel amazing when you sweep them over your eyelid. They feel almost as soft as the Real Techniques brushes, which is quite a big statement since the Real Techniques brushes have been my all time favourite. They also pick up a good amount of product which glides nicely onto the eyelid. They don't smell of anything unlike some brushes that have a horrible weird smell that stays even after you've just washed them. They're also lightweight and I haven't experienced any bristles falling out which is great.


The set includes seven brushes where each one is labelled with its purpose. My favourite one is the angled shader which I find great for blending out eye shadow in the crease area due to its soft and fluffy bristles. The classic shader is also a good one for packing on eye shadow. 

I was impressed with the packaging as they arrived in a nice black tube where each brush was individually wrapped. However, one negative is that some of the brushes like the small shader are quite stiff because the bristles are quite dense so there's not much movement.

Overall, I am very happy with this purchase and would definitely recommend it if you are looking for an affordable set of high quality brushes, that look and feel professional. 

You can check them out here on Amazon.


Saturday, 7 November 2015

Blistex Lip Balms


It's a dull, gloomy, wet and windy Saturday afternoon in London and I'm in my comfy oversized clothes munching on a Crunchie bar as I type this...

Here's a quick post on two lip balms from Blistex which I have found to be quite amazing when it comes to soothing dry and chapped lips.

Firstly, we've got the Medplus lip balm which contains jojoba oil, cocoa butter and menthol. It has a medicated scent and once applied, it has a slight tingling feel on the lips which shows it's working its magic, transforming your lips from chapped to smooth and hydrated lips. I apply it in the morning and whenever I need to during the day. It also works great when you apply it before bed as it restores your lips overnight making them feel nice and healthy again (sounds like some kind of serious and technical process). 

Secondly, we've got the Daily Lip Conditioner which contains olive oil, grape seed oil and aloe vera. It does the same job in keeping your lips soft and hydrated. It also has a slight tingling feel when you apply it but has a sweeter scent compared to the Medplus. Both lip balms do not feel heavy, greasy or sticky on the lips but feel light and moisturising. They both have SPF 15 which is an added bonus (as you all may know, it can often get extremely hot and sunny (California style) in London, haha!).

Which one do I prefer? 

I do love them both. I normally use the Medplus when my lips are extra dry and need rescuing, but only use the Daily Lip Conditioner when I just want to keep my lips protected and moisturised. However, I don't think I would be able to survive without the Medplus, I feel that it keeps my lips moisturised for longer. I rely on it so much that I have one at home and one in my bag all the time. 

After seeing the word 'lips' floating around in nearly every sentence of this post, the word itself is starting to look weird. Enough of 'lips' for now!

Also, I've just checked online and both lip balms are currently on offer in Boots!


Wednesday, 4 November 2015

Autumn Favourites


Hello there! I feel like this is kind of a 'late autumn favourites' post because we're already in the month of November and winter is literally around the corner! However, the leaves are still falling off trees and November is technically the last month of autumn, so we're all good! Anyway, here are five things I have been loving this autumn! 


Palmer's Shea Butter Cream

I find it quite embarrassing when I'm on the train and notice how dry my hands are when I'm holding onto the pole. This is particularly in the corners between my fingers as it can get super dry to the level where it becomes ashy which is not pleasant to look at (not that anyone has the time to look at each other's hands on a packed train but you never know).

This cream by Palmer's has saved me. It leaves my hands super smooth and it doesn't feel greasy or heavy. The texture is quite thick at first but when you apply it and work it into your skin, it feels light and moisturising. It keeps my hands feeling nice and soft but most of all, it smells delicious! It has definitely become my handbag essential.


Garnier Ultimate Blends, The Marvellous Glow Oil

The ends of my hair can sometimes get quite dry due to split ends and the cold and windy weather. I have been using this hair oil by Garnier which has argan and camellia oils. After using it for the past few weeks, it has really made a big difference as I have noticed that my hair isn't as dry as before. It feels silky smooth and hydrated and has a nice shine to it. It also smells amazing too!

I normally apply two pumps of it onto the palms of my hands and run it through the lengths of my wet hair after washing it, focusing more on the ends. You can also use it in between washes to add shine and protection which I often do so.


Saffiano Mini Purse, Kurt Geiger

I can literally write a whole page on why I love this Kurt Geiger purse but I won't. I was using one of those normal sized wallets which I soon found to be quite bulky and heavy and found it difficult to fit into my smaller handbags. So I wanted something smaller and more practical but would still be able to hold the same amount of things.

This purse is the perfect size and is nearly half the size of usual wallets. It's lightweight and doesn't take up much space in your bag. It has two zip compartments which gives you easy access to the important things. I use one side for my coins and the other for the cards I regularly use. There are card slots inside which can fit more than one in each as they are quite spacious and there's also a side bit for your notes too.

It is made with saffiano leather which makes it feel like a good quality item. It is made well and feels very durable too. It is also available in other colours but I opted for black as it's a classic colour and I know I wouldn't get bored of it. This is definitely something I'll be using for a very long time! 


Dream a Little Dream by Giovanna Fletcher

When it comes to books, I'm a big fan of sweet and cute romantic novels. I find it really nice and relaxing when you can escape reality by simply just reading a good book that can make you smile. I am currently in the middle of reading Dream a Little Dream by Giovanna Fletcher and I can already tell that it is going to be one of my favourites!

I won't reveal too much of the plot but it follows the story of Sarah who's in her late twenties, her boyfriend dumped her for someone else but that's not the end of it, as she still has to see the happy couple because they're in the same circle of friends. Each chapter begins with Sarah's dreams which include lots of random things and also a stranger called Brett who keeps reappearing. Things take an exciting turn when Brett actually appears in real life...

It sounds good right? I can't wait to carry on reading it!  


Scarf, Primark

I had hoped to find a nice autumnal coloured scarf this year and came across this tan/brown scarf in Primark and immediately grabbed it! It's super soft, warm, it's a good length so you can wrap it around your neck twice, but most of all, it's the perfect colour for autumn and winter. I've been wearing it with my black coat and it just brings a nice cosy and warm feel to an outfit. 

I hope you enjoyed reading this post and have seen something you may also be interested in! 

Until next time!

Wednesday, 26 August 2015

Columbia Road Flower Market

I recently went to East London's flower market on Columbia Road, which I think is the perfect place to spend your Sunday morning if you're obsessed with flowers like I am! As soon as I arrived, I didn't know where to look, it was like a sea of flowers. It was quite overwhelming because everything was so bright and colourful! Being surrounded by such beautiful things, I obviously had to bring out my phone to take a few snaps!


There were so many different types of flowers which included hydrangeas (my all time favourite!), peonies, sunflowers (which I find look quite scary for some reason), cyclamens, kalanchoes, even banana plants (quite interesting!) and so much more!


The East End banter between the market traders created a lively and loud atmosphere which made the experience of being there even more enjoyable. You could hear them chant 'two for a fiver!' as you squeeze through the crowds.


It was quite hard deciding what to buy! I was so tempted to leave with a few bunches of flowers but I managed to control myself and only bought pink cyclamens and an orchid! I've been wanting an orchid for ages! 


The flower market is open every Sunday between 8am to 2pm. If you want to avoid huge crowds and grab the nicest and most fresh looking bunch of flowers, get there early! However, you can hang around until closing time to grab the best bargains!  


As August is coming to an end, I hope you have had a nice summer! Now bring on autumn and winter!